Monday, July 16, 2012

Bedroom Closet After!

Before

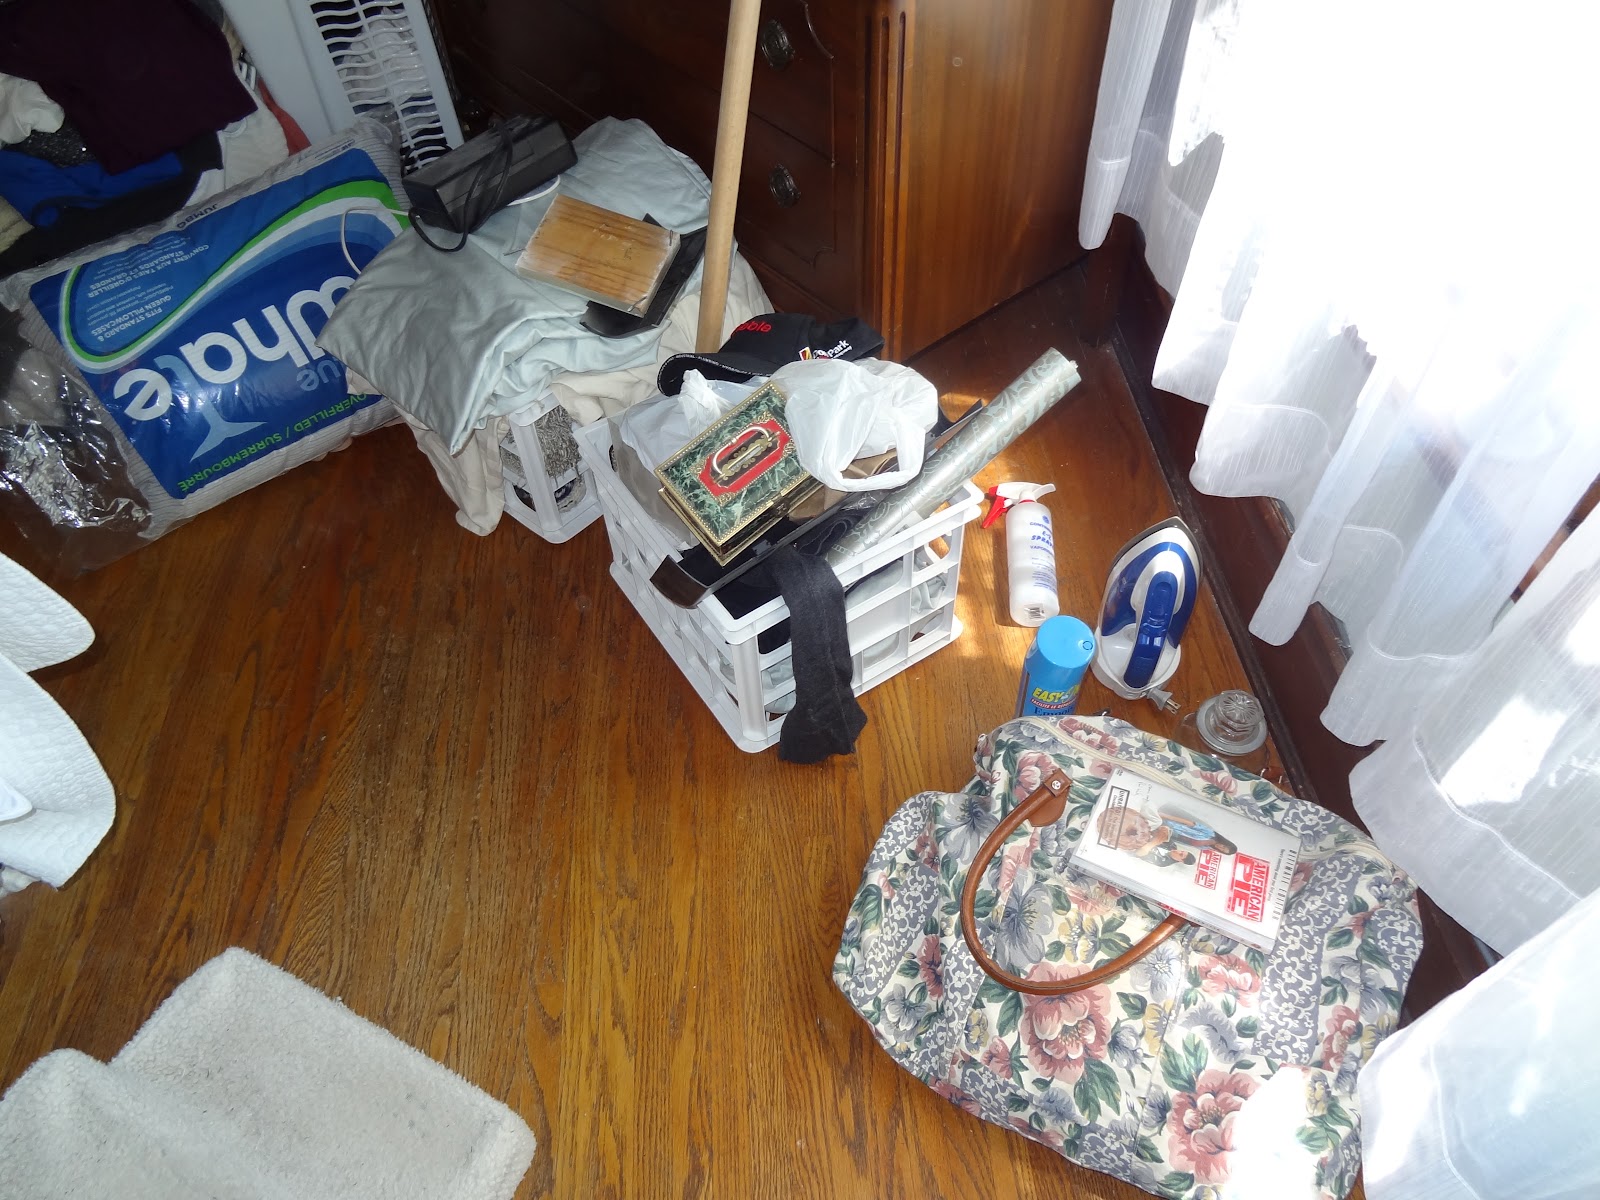
On Friday I showed you this picture of my horrible bedroom closet.  It was a disaster!  Mr. P. and I spent an entire weekend re-designing it and now it looks amazing!


Mr. P. and I completely emptied the closet.  I could not believe how much junk we got out of there!  This is how I left off on Friday.

And now for the BIG reveal!

After
I didn't take enough pictures during the process because I was so busy I forgot!  As you can see Mr.P. removed all the shelves on the left hand side of the closet and he also removed the bar.  Once he finished that I got in there and painted the walls with some leftover paint from the bedroom.  The funny thing was that the new paint almost matched the old paint perfectly!  The new was just slightly more grey.  The old paint was original to the house (110 years).


I also add some wallpaper on each side of the closet.


Mr. P. then installed three sets of wooden shelves stacked one on top of the other, 2 bars to hang clothes and a shelf on top.


I put extra sheets, blankets and pillowcases on the top shelf.  Mr. P. got the top bar to hang his clothes.  It's quite a bit higher than I would ordinarily put it but Mr. P. is 6'4" and can easily reach it.


Mr. P. installed a lower bar for my clothes.  We have essentially doubled our hanging space!  I found the trunk on the floor at Walmart and this serves double duty.  Not only does it hold all my sweaters, keeping them neatly folded inside and eliminating any hanger marks, but it is also great to stand on to reach the top shelf.

I added some baskets onto the shelves to hold things like socks and underwear.  I also added some to sort some of my jewellery.


I got these at the dollar store and sorted all of my bracelets into them to keep them from getting tangled.


To keep my necklaces from getting tangled I added some hooks to a piece of trim and hung them all up.  It makes it much easier to find the one I want in a hurry.


I added some hooks to the side of the shelves to hold Mr. P's ties (his suits and my dresses are kept in a cedar-lined closet in the hallway).


I also added some hooks on the right hand side of the closet to hold belts and anything else that needs to hang up.


I am absolutely thrilled with how it all turned out!  Mr. P. is thrilled because he now has 2/3 more space to hang his clothes!

We did a major purge of items out of that closet.  My ironing board went into another room and  a lot of the extra sheets went elsewhere simply because they no longer went with the new decorated room.  I donated throw pillows and plenty of clothes.  One of the things that I am most proud of is letting go of this.


When I was 18 I lost a dear friend to Cystic Fibrosis.  Shortly after that loss I had to paint a still-life in art class and the items I chose were things that meant something between my friend and I.  I gave her the teddy bear while in the hospital, she bought me the necklace, our favourite cassette tape and a picture of her and I together.  I've held on to it all these years but I didn't really honour it because it was always stuck in a closet somewhere.  I decided it was time to let it go.  I took a picture of it so that I could remember it.

Over the years I have cleaned that closet over and over again only to have it get messed up again within a couple of weeks.  By completely re-designing it I have been able to keep it looking exactly the same for almost two months now.  Everything has a spot and everything is easy to find.


Friday, July 13, 2012

Bedroom Closet Before


I can't believe I'm doing this!  Ok, deep breath!  This is a picture of my bedroom closet before I totally re-designed it.


It was horrible and it was even worse than usual because I knew that I was going to be gutting it and so I had basically stopped cleaning it altogether.  And while I am making confessions I should also admit that 3/4 of that rod are my clothes.  Poor Mr. P., like most men, only got a small portion of the actual hanging space.


I had several sweater hanging on the back of the door and that wasn't good for either the door or my sweaters.


The top shelf was up so high I could barely reach anything up there.


The next shelf held even more stuff including things that I used for ironing.


This shelf held jewelery and other junk.


There is an extra pillow and some books and I can see a throw pillow on this shelf.


I'm actually surprised that I can see some floor in there!  The crates held extra sheet sets and the bottom shelf held more sweaters and sweatshirts.


I even kept my ironing board in this closet.


After taking all the clothes off of the rod we could see just how much more junk we had on the shelves!


There were even hooks on the wall behind the clothes that had belts and ties hanging on them.


As you can see, the closet was very poorly designed.  The rod went right through the middle of the shelves making it difficult to see anything on the back half of them.  I'm also pretty sure that the green is the original paint colour.


I cannot believe that this much stuff came out of that little bedroom closet!  Let's just say that Mr. P. and I did a major purge before we started putting things back in!

Come back on Monday and I will show you how I re-designed the closet so that it not only looks amazing but also functions much better.


Wednesday, July 11, 2012

The Bed


"The closer something is to your body the better it should be.  This argues for fine sheets and cheap drapes." - Marni Jameson

Oprah says that everyone should have a bed that they love; a bed that at the end of each day feels like a well-earned reward.  I have actually done quite a bit of research on the subject of bedding.  I do these things, dear reader, so that you don't have to!  In fact, I just finished a book that devoted a whole chapter to slip covers alone! Oh, the sacrifices I make!  

A few years ago I made the decision to make the bed every single day.  But with a top sheet and a blanket or two on the bed I found that it was very time consuming.  I went on the Internet to see if I could find another way to make the bed that was more efficient.  This is when I discovered that, in general, the British do not use top sheets!  I was informed that they use a duvet and a duvet cover.  The duvet cover acts as a top sheet so there was no need to put another top sheet on the bed.  Genius! And there was a whole website devoted to this!  I immediately began doing this and found that it was just one quick flick of the bedding and the bed was made.  It made it so much easier to make the bed every morning.

However, there was a downside.  Every now and then I would have to fight with duvet inside the duvet cover.  It would bunch up at one end even though the corners were tied to the duvet cover.  And it was a pain to put back in the cover on wash day.  We also had a down duvet (which I loved!) that could not be washed regularly and with our three fur babies sleeping with us, everything needs to be washable.

Last year I had the opportunity to stay at a higher-end hotel and found the very, comfortable bed covered in just a duvet, no duvet cover.  Surely it had to be washable and so that sent me on a quest for a duvet that could go into the washing machine every week.  I ended up at a quilt store and the sales lady told me about gel-coated, micro fibre duvets.  The gel keeps the micro fibre from bunching and allows the duvet to be washed regularly. I bought it immediately!

The duvet is too heavy for the summer so I change the bedding over to just a duvet cover on it's own when the weather starts to warm up.  It's basically two sheet sewn together and it give us just enough warmth in the summer time.

In changing over the bedding from winter to summer, I also decided to wash the bed skirt.  And, since I had the mattress off to wash the bed skirt, I felt that this was also the time to remove the box spring and give the floor under the bed a good cleaning.

I never keep anything under the bed and I do vacuum under there regularly, however, I found that it was difficult the get all of the dust from around the electrical cords that were laying on the floor.


I decided it was time to get the cords up off the floor.


I used plastic tie straps to attach a power bar to the bottom rung of the wrought iron head board.  I also tie- strapped the cords to the same bar.


I put the bed back together and now everything should stay cleaner (Mr. P. is allergic to dust).  I set up a charging station for Mr. P's phone beside the bed so even that cord is neatly off the floor and out of the way.


Do you have any tips for making the bed?  What type of bedding do you love?


Monday, July 9, 2012

My Bedroom


Today I thought that I would give you a tour of our master bedroom.  Actually this isn't the official master bedroom in the house.  We converted that into a media room.  It's even larger than this room.  In fact, the older P's room is larger than this one too. But this room is plenty big enough for Mr. P. and I.


Last November we had someone come in and put 1/4 inch drywall on all of the walls in this room.  Because the baseboards and trim were so thick, there is still a small ledge on them even with the extra 1/4 inch.  Best of all I did not have to strip 110 years worth of wallpaper!  I did that in the kitchen and it took me 6 months!


This dresser and....


this one are both original to the house.  The daughter of the original owner left us the bedroom suite in her will because she wanted it to end up back in her old room.  There is also a bed and a dressing table.


The bed will become a guest bed someday (it's only a double) and the dressing table sits in the hallway.


This dresser comes from a house across the street.  My neighbor was 101 years old when she passed away and we bought her dresser from the estate sale.  I love that much of my furniture has a story!

I know the room looks a little sparse in these pictures but I wasn't able to decide on what type of artwork I wanted.

UPDATE:  Since I first wrote this blog post I have come across a picture that I love for above the bed.


This is what it looks like now.


I LOVE it!  Now I just have to find more pictures that will complement this one and the rest of the room.

I've tried very hard to keep the decorations in the house faithful to the Victorian era while still maintaining modern amenities.  It isn't always easy because the Victorians loved a cluttered look whereas I don't want to spend my days dusting!

I've used both antiques and reproductions to give my room a Victorian look.  The bed is a reproduction.  It was made in California by Wesley Allen in their "Hamilton" design.  In a sense it was custom-made because we chose the design, the colour and the finish.  I highly recommend their beds.  Once ours was delivered our old mattress and box spring felt like new because there was so much support underneath.


The rest of this week and into the next I will be showing other areas of my bedroom.  I can't wait for my big closet reveal!  Stay tuned!


Tuesday, July 3, 2012

Chocolate Filled Strawberries


Have you ever bitten into a chocolate covered strawberry only to wish that there was more chocolate and less strawberry?  I know I have and to solve that little problem I decided to fill my strawberries with chocolate so that I could fit in as much chocolate flavour as possible!

All you need are three simple ingredients.


You will need:

150 grams of good quality dark chocolate (I used Lindt)
1/2 cup whipping cream
strawberries

That's it!  First slice the stems off of the strawberries.


With a small knife, hollow out the inside.  I just followed along the white part and everything came out easily.


The strawberries have to stay upright while the chocolate ganache hardens in the centre so I turned an egg tray upside down and they fit perfectly in the spaces on the bottom.


Now to make the chocolate ganache.  I used 1/2 of the large bar pictured above.


Finely chop the chocolate and place it in a glass bowl.


Next heat the whipping cream until it is hot but not boiling.


Then pour the hot cream over the chocolate and let it sit for about 30 seconds to melt the chocolate.


Now start to whisk the mixture together.


Keep whisking until the mixture is smooth.


At this point you could add a couple of tablespoons some sort of liqueur to the mixture.  I have added some Creme de Cacao but a nice orange flavoured liqueur would be good too.  I opted not to add any to this batch.

Now it's time to fill a piping bag.  If you don't have a piping bag you can use a Ziplock bag instead.  Place the bag inside a large glass to hold it open for you while you pour in the ganache.


Do NOT cut the tip yet as the ganache is still quite runny!  Close the top of the piping bag and hold the bag over the strawberries.


Now you can carefully cut the tip. I have yet to cut it without making a mess!


All that's left is to start filling the strawberries.


 Once the strawberries are filled, place them in the fridge for at least an hour so that the ganache can harden.


There was a little ganache left over but I found a quick and easy way to clean that up!


And that is my Chocolate Filled Strawberry Recipe!